SDK Integration Guide
Getting Started
Example Project
For a sample project demonstrating the completed steps in this integration guide, refer to the Example project.
Requirements
- The latest version of Android Studio is installed and set up on a computer
- An Android project with the Minimum SDK set to
API 22or above. If you don't have an Android project yet, you can follow these instructions to create one. - A GitHub account. Follow these steps to create a GitHub account if don't already have one.
Setting Up Your GitHub Account to Access the HealthRhythms SDK
Contact HealthRhythms support to authorize your GitHub account to access the HealthRhythms Android SDK. Once your GitHub account is authorized, you should see packages listed on the HealthRhythms packages page on GitHub.
Creating GitHub Personal Access Token
From your GitHub account go to Settings > Developer settings > Personal access tokens to create a GitHub Personal Access Token.
The GitHub Personal Access Token should have no expiration and read:packages permission.
Copy and paste the GitHub Personal Access Token in a temporary text file. You'll need it in the upcoming steps.
Note
For more information on creating a GitHub Personal Access Token, see GitHub's guide on how to create a GitHub Personal Access Token.
Configuring Google Fit
The HealthRhythms SDK and its sensors require Google Fit APIs for Android.
Follow the Google guide to configure the Google Fit APIs to create and configure an OAuth 2.0 client ID in the Google API Console.
❗Important for sample apps and unpublished apps
After configuring the OAuth consent screen on the Google Cloud console, click Publish App button on the OAuth consent screen.
Clicking Publish App button will make the OAuth accessible to all google accounts. Otherwise, you would need to add test user accounts that can access the OAuth.
Setting Up Firebase Cloud Messaging
The HealthRhythms backend communicates with the application via Firebase cloud messaging, for example, sensing push notifications to your application. Firebase cloud message service is needed in your application.
Adding Firebase Dependencies:
- Create a Firebase project
- Download the google-services.json file into your Android project
-
The project should meet the following requirements:
-
The app-level folder should have the google-services.json file (exact location as the app-level build.gradle)
- The project-level build.gradle should have google services added to the classpath. The project-level build.gradle should look like this:
// Top-level build file where you can add configuration options common to all sub-projects/modules.
buildscript {
    dependencies {
        // Add the following line:
        classpath 'com.google.gms:google-services:4.3.13'  // Google Services plugin
    }
}
Adding the HRSensing SDK to Your Project
Configuring Maven in the Android Project
Next, you need to modify the project-level repository settings in the Android project to include the maven repository that stores the SDK artifacts.
Open the settings.gradle file in the Project Root Folder add the following snippet to the existing list of repositories:
//some other repositories here
maven {
    url = "https://maven.pkg.github.com/healthrhythms/android-hrsensing-dist"
    credentials {
        username = 'replace with your GitHub account username'
        password = 'replace with the GitHub Personal access token created in the previous steps'
    }
}
The snippet of the settings.gradle file should look like this:
//some other settings above
dependencyResolutionManagement {
    repositories {
        google()
        mavenCentral()
+       maven {
+           url = "https://maven.pkg.github.com/healthrhythms/android-hrsensing-dist"
+           credentials {
+               username = 'replace with your GitHub account username'
+               password = 'replace with the GitHub personal access token'
+           }
+       }
    }
}
Note
You could include these repository settings in the Project Root Folder > build.gradle or Project Root Folder > app > build.gradle depending on your project setup. For more information on modifying the settings.gradle file, see the Android Studio guides on the settings.gradle file.
Adding the HRSensing SDK Dependencies
❗Important
The minimum SDK version of HRSensing SDK packages is 22. Set the minSdk in app-level build.gradle to at least 22
- Check the latest version number of the HRSensing SDK package.
- Create the
sensingSdkVersionvariable in the project-level build.gradle file (Project Root Folder > build.gradle) to store the latest version of the HRSensing SDK package. -
Add the
sensingSdkVersionvariable to the bottom of the project-level build.gradle: -
Add the HRSensing SDK package as a dependency in your app-level build.gradle file. The app-level build.gradle file is located at Project Root Folder > app > build.gradle:
dependencies { // Other dependencies here implementation "com.healthrhythms.hrsensing:hrsensing:$sensingSdkVersion" // Firebase dependencies implementation platform('com.google.firebase:firebase-bom:30.3.1') implementation 'com.google.firebase:firebase-messaging-ktx' // Google Fit dependencies implementation 'com.google.android.gms:play-services-fitness:21.1.0' implementation 'com.google.android.gms:play-services-auth:20.2.0' } -
Validate your project is configured correctly:
-
Click File > Sync Project with Gradle Files to download the HealthRhythms packages. Internet connection is needed to download the packages.
- Go to Build > Make Project to build the project. The project should build successfully if all dependencies and version numbers are correct.
Troubleshooting
Problem
If you get a build error Android Gradle plugin requirements:
 Your project has set `android.useAndroidX=true`, but configuration `:app:debugRuntimeClasspath`
 still contains legacy support libraries, which may cause runtime issues.
 This behavior will not be allowed in Android Gradle plugin 8.0.
 Please use only AndroidX dependencies or set `android.enableJetifier=true` in the `gradle.properties`
 file to migrate your project to AndroidX (see https://developer.android.com/jetpack/androidx/migrate for more info).
 The following legacy support libraries are detected:
 :app:debugRuntimeClasspath -> com.healthrhythms.hrsensing:hrutils:0.14.10 -> com.jaredrummler:android-device-names:1.1.7 ->
 com.android.support:support-annotations:27.0.2
Solution
Open Project Root Folder > gradle.properties and add android.enableJetifier=true at the bottom of the file.
Configuring the Application Class
Creating the Application class
Depending on your language preference, add a new Kotlin or Java class that inherits the Application class to the Android Project. This guide uses the Kotlin programming language.
-
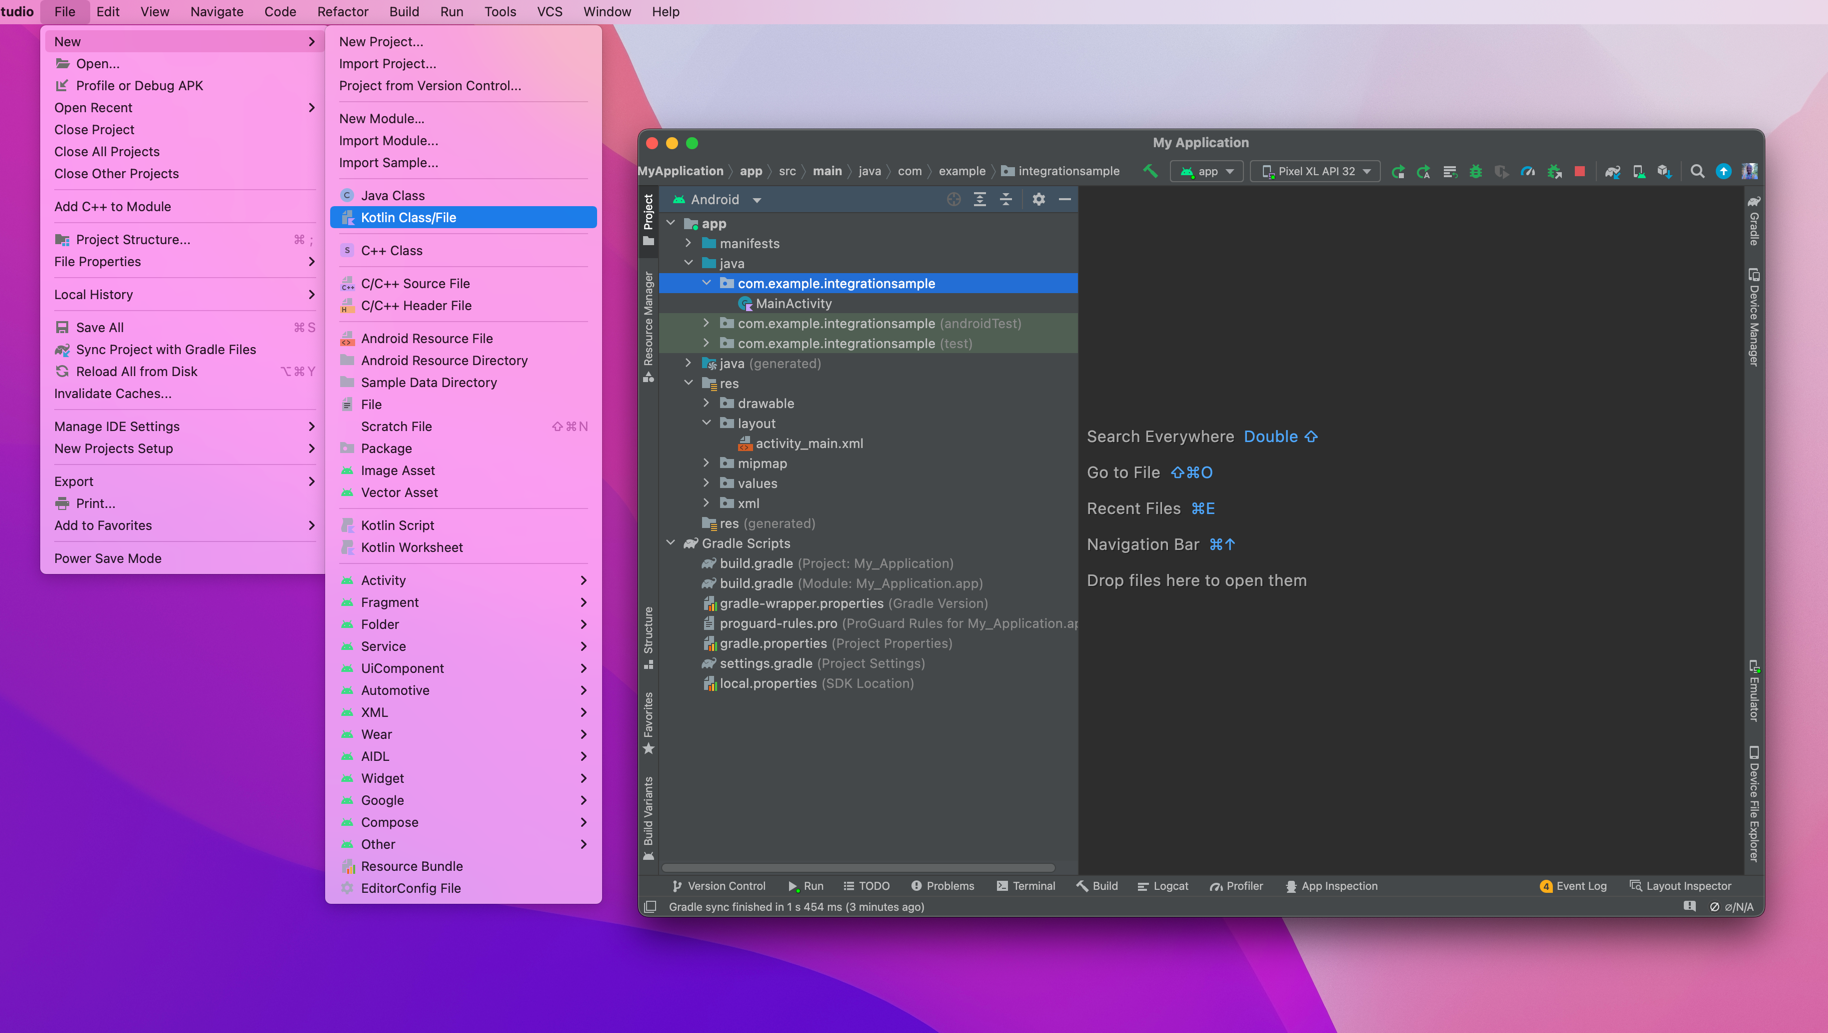
Add a new class - select the main package of your project, then go to File > New > Kotlin Class/File:
-
Give the Kotlin class a name, for example,
MainApplicationand press enter key to create the class. TheMainApplicationshould inherit from theApplicationclass: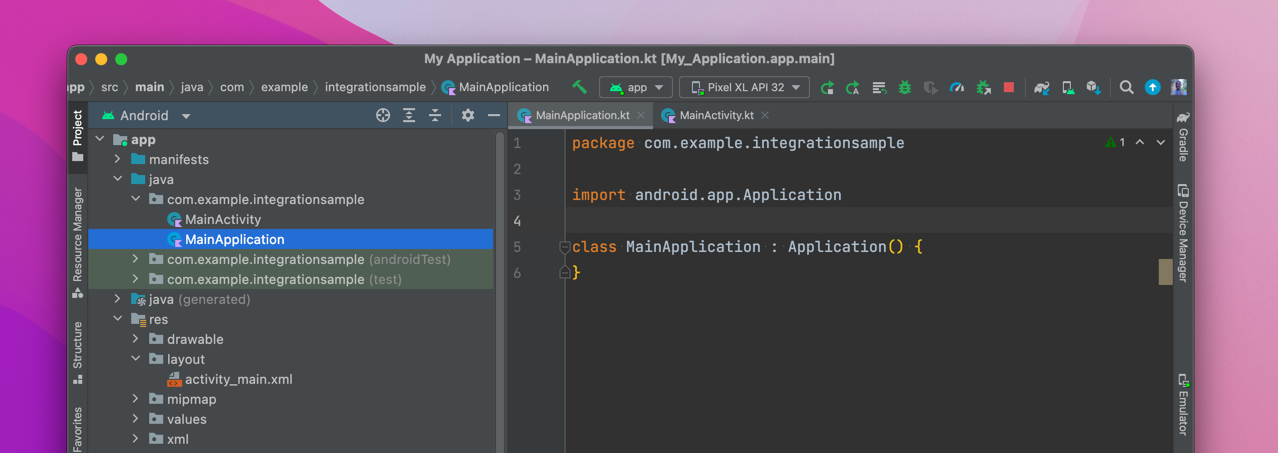
-
Set the
MainApplicationas theApplicationclass of the project in the AndroidManifest.xml file by addingandroid:name=".MainApplication"to theApplicationtag. -
The
Applicationtag in the AndroidManifest.xml should look like this: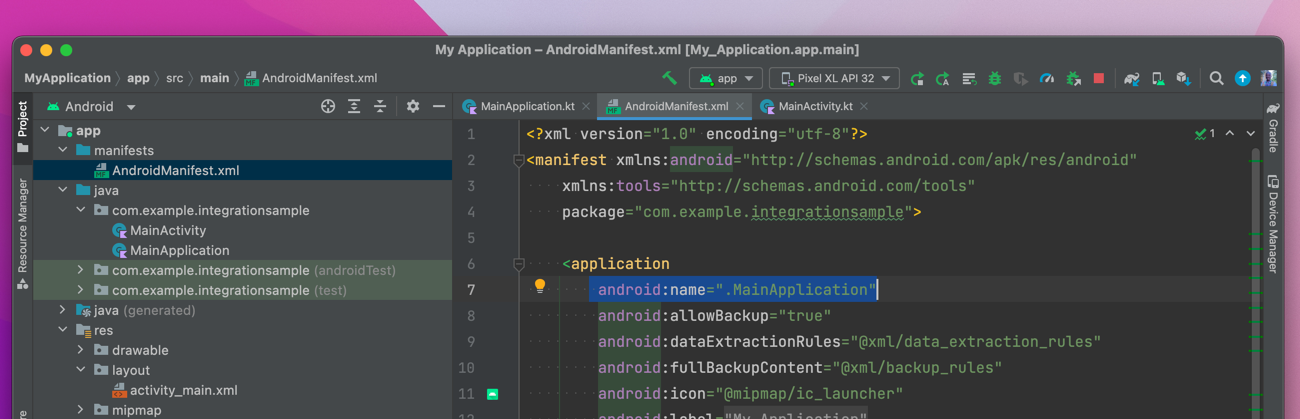
💡 Tip
For more information on editing the Android Manifest, see Google's guide on how to edit the AndroidManifest.xml file.
Setting Up the Application Class
Define application and Notification configurations for all notification channels in the MainApplication by replacing its contents with the following code:
import android.app.Application
import com.healthrhythms.api.ForegroundWorkerChannelConfig
import com.healthrhythms.api.GeneralChannelConfig
import com.healthrhythms.api.NotificationConfig
import com.healthrhythms.api.SelfReportsChannelConfig
import com.healthrhythms.api.SelfReportsReminderConfig
import com.healthrhythms.api.SensingActiveChannelConfig
import com.healthrhythms.api.SensingRestartChannelConfig
import com.healthrhythms.api.AppConfig
import com.healthrhythms.api.SensingConfig
import com.healthrhythms.api.HRSensing

class MainApplication : Application() {

    override fun onCreate() {
        super.onCreate()

        val notificationTapClass = NotificationActivity::class.java

        HRSensing.init(
            this, SensingConfig(
                AppConfig(
                    versionCode = BuildConfig.VERSION_CODE,
                    versionName = BuildConfig.VERSION_NAME,
                    name = getString(R.string.app_name),
                    applicationId = BuildConfig.APPLICATION_ID,
                    isDebug = BuildConfig.DEBUG
                ),
                NotificationConfig(
                    sensingActiveChannelConfig = SensingActiveChannelConfig(
                        notificationId = 601,
                        notificationTapIntentClass = notificationTapClass
                    ),
                    selfReportsChannelConfig = SelfReportsChannelConfig(
                        notificationIdRange = 602..900,
                        reminderConfig = SelfReportsReminderConfig(
                            daysAfterActive = listOf(0), // Reminder on 1st day
                            daysBeforeExpiry = listOf(0) // Reminder on last day
                        ),
                        notificationTapIntentClass = notificationTapIntentClass
                    ),
                    foregroundWorkerChannelConfig = ForegroundWorkerChannelConfig(
                        notificationIdRange = 901..1199,
                        notificationTapIntentClass = notificationTapClass
                    ),
                    sensingRestartChannelConfig = SensingRestartChannelConfig(
                        notificationId = 1200,
                        sensingRestartIntentClass = notificationTapClass,
                        showSensorDisabledNotifications = false,
                        sensorEnableIntentClass = notificationTapClass
                   ),
                   generalChannelConfig = GeneralChannelConfig(
                        notificationIdRange = 1201..1250,
                        notificationTapIntentClass = notificationTapClass
                   )
                )
            )
        )
    }
}
Note
In the code snippet above, SensingActiveChannelConfig defines the notification channel configuration for the foreground notification, which indicates that sensing is active.
SelfReportsChannelConfig defines the notification channel configuration for self-reports.
SensingRestartChannelConfig defines the notification channel configuration for notifications that are shown when requesting the app be restarted in order to restart sensing.
Enable support for Push Notification from HealthRhythms
This step allows the HealthRhythms SDK to receive diagnostic messages from the HealthRhythms Backend, which is useful in troubleshooting sensing issues for your end users, or the remote-disable functionality. This step also allows the delivery of self reports from the HealthRhythms Backend.
-
Add a new class named
AppFirebaseMessagingServiceto your project that inheritsFirebaseMessagingServiceand overridesonNewTokenandonMessageReceivedmethods. TheAppFirebaseMessagingServicecode should now look like this:import com.google.firebase.messaging.FirebaseMessagingService import com.google.firebase.messaging.RemoteMessage import com.healthrhythms.api.HRSensing class AppFirebaseMessagingService : FirebaseMessagingService() { override fun onNewToken(token: String) { HRSensing.getInstance().handleFirebaseToken(token) } override fun onMessageReceived(remoteMessage: RemoteMessage) { HRSensing.getInstance().handleFirebaseCloudMessage(remoteMessage) } } -
Add the
Your AndroidManifest.xml file should look like this:AppFirebaseMessagingServiceclass, which inheritsFirebaseMessagingServiceas a service in the AndroidManifest.xml file: -
Build and run the project.
Configure Sensing in the Project
Your project should have a MainActivity class added by default. In this example, we will configure sensing in the MainActivity.
Downloading configuration
The HealthRhythms Sensing SDK requires a valid configuration file to work, and this needs to occur before attempting to initialize the sensors to commence sensing. Downloading the configuration file requires an internet connection.
Typically, downloading the configuration should occur as the first stage of your onboarding flow. You only need to download the configuration file once.
You can use the HRSensing.getInstance().hasValidConfiguration() function to check if there’s an existing valid configuration file and to determine whether a download is required.
Call HRSensing.getInstance().downloadConfiguration() and pass in your study name or activation code (e.g. hr-test-1), and a SensingListener.
HealthRhythms assign the activation code. Please contact support if you are unsure what your activation code is.
The code of the MainActivity should look like this:
import android.os.Bundle
import android.util.Log
import androidx.appcompat.app.AppCompatActivity
import com.healthrhythms.api.HRSensing
import com.healthrhythms.api.Result

class MainActivity : AppCompatActivity() {
    override fun onCreate(savedInstanceState: Bundle?) {
        super.onCreate(savedInstanceState)
        setContentView(R.layout.activity_main)

        downloadConfig()
    }

    private fun downloadConfig() {
        if (HRSensing.getInstance().hasValidConfiguration()) {
            return
        }

        val studyName = "hr-test-1"
        HRSensing.getInstance().downloadConfiguration(studyName) { result ->
            if (result is Result.Failure) {
                Log.d(TAG, "DownloadError: ${result.error}")
            }
        }
    }

    companion object {
        private const val TAG = "MainActivity"
    }
}
success) of the SensingListener callback indicates whether the activation was successful. The SensingError object (error) indicates whether there was a problem during activation, which will provide a description string of the problem.
Errors may occur for several reasons, such as:
- The incorrect configuration name was entered.
- There is no internet connection.
- The configuration was downloaded but failed to parse.
Set the Unique User ID
Set a unique User ID example, User256, to allow user identification on the HealthRhythms dashboard.
Note
Including test anywhere in the user ID string will cause our backend to mark the user as a test user. Typically, setting the user ID should also occur as part of your onboarding flow, post-activation.
Request Sensor Permissions
Sensor permissions must be granted to enable sensing data collection. Granting sensor permissions should typically occur as part of your onboarding flow. The sample code for requesting sensor permissions is available in the Example project.
Check the sensors that require permissions by calling HRSensing.getInstance().getRequiredPermissions(). This call returns a List<PermissionType> which may include the following:
LOCATION: Location permission (android.Manifest.permission.ACCESS_FINE_LOCATION) is required. For API level 29 (Android 10) and higher, background location permission (android.Manifest.permission.ACCESS_BACKGROUND_LOCATION) is required.GOOGLE_FIT: Google Fit permission is required for read access toDataType.TYPE_STEP_COUNT_DELTAandDataType.AGGREGATE_STEP_COUNT_DELTAare required.ACTIVITY: Google Activity recognition permission (android.Manifest.permission.ACTIVITY_RECOGNITION) is required.APP_USAGE: Application usage permission is required.
Data Quality
If data is missing for a user for a particular data stream, incorrect or denied permissions are often the culprit. The user must manually enable incorrect settings or user-denied permissions for your app.
To enable support for receiving app notifications when required sensor permissions are denied, set showSensorDisabledNotifications to true for SensingRestartChannelConfig in your MainApplication class.
When the user taps on the notification, the app will open the activity specified with the sensorEnableIntentClass property of the SensingRestartChannelConfig class, with a boolean intent extra
EXTRA_IS_FROM_PERMISSIONS_WATCHER.
Initialize the Sensing SDK
Once there are no pending unauthorized permissions and a User ID has been assigned, call HRSensing.getInstance().initializeSensing(sensingListener: SensingListener) to initialize sensing,
and start sensor data collection and uploads to the HealthRhythms Backend.
You can call HRSensing.getInstance().canBeInitialized(listener: SensingListener) to assess if sensing can be initialized.
private fun initializeHRSensing() {
    HRSensing.getInstance().initializeSensing { result ->
        if (result is Result.Failure) {
            log("InitializeError: ${result.error}")
        }
    }
}
We recommend you initialize sensing as part of your onboarding flow after permission authorization or once in the project's main Activity's onCreate function to ensure that background sensing can occur as soon as the app is initialized.
Present the Next Self Report User Interface
Active self reports are periodically downloaded from the HealthRhythms backend or when your app receives a push notification to download self reports. Support for Push Notification from the HealthRhythms backend is required in the latter case.
Notification reminders are shown for due self reports. The self report user interface is presented when the user clicks the self report reminder notification. In addition, we recommend you show active self reports on a list view or similar.
private suspend fun downloadAndStartSelfReport() {
    with(HRSensing.getInstance()) {
        /* Download all active self reports. */
        val selfReportsList = refreshAndGetSelfReports(applicationContext)

        /**
         * Self reports can be presented in a recycler view, for example.
         * Here we start the first self report if selfReportsList has an entries
         */

        selfReportsList.firstOrNull()?.let {
            startSelfReportActivity(applicationContext, it.prompt.id)
        }
    }
}
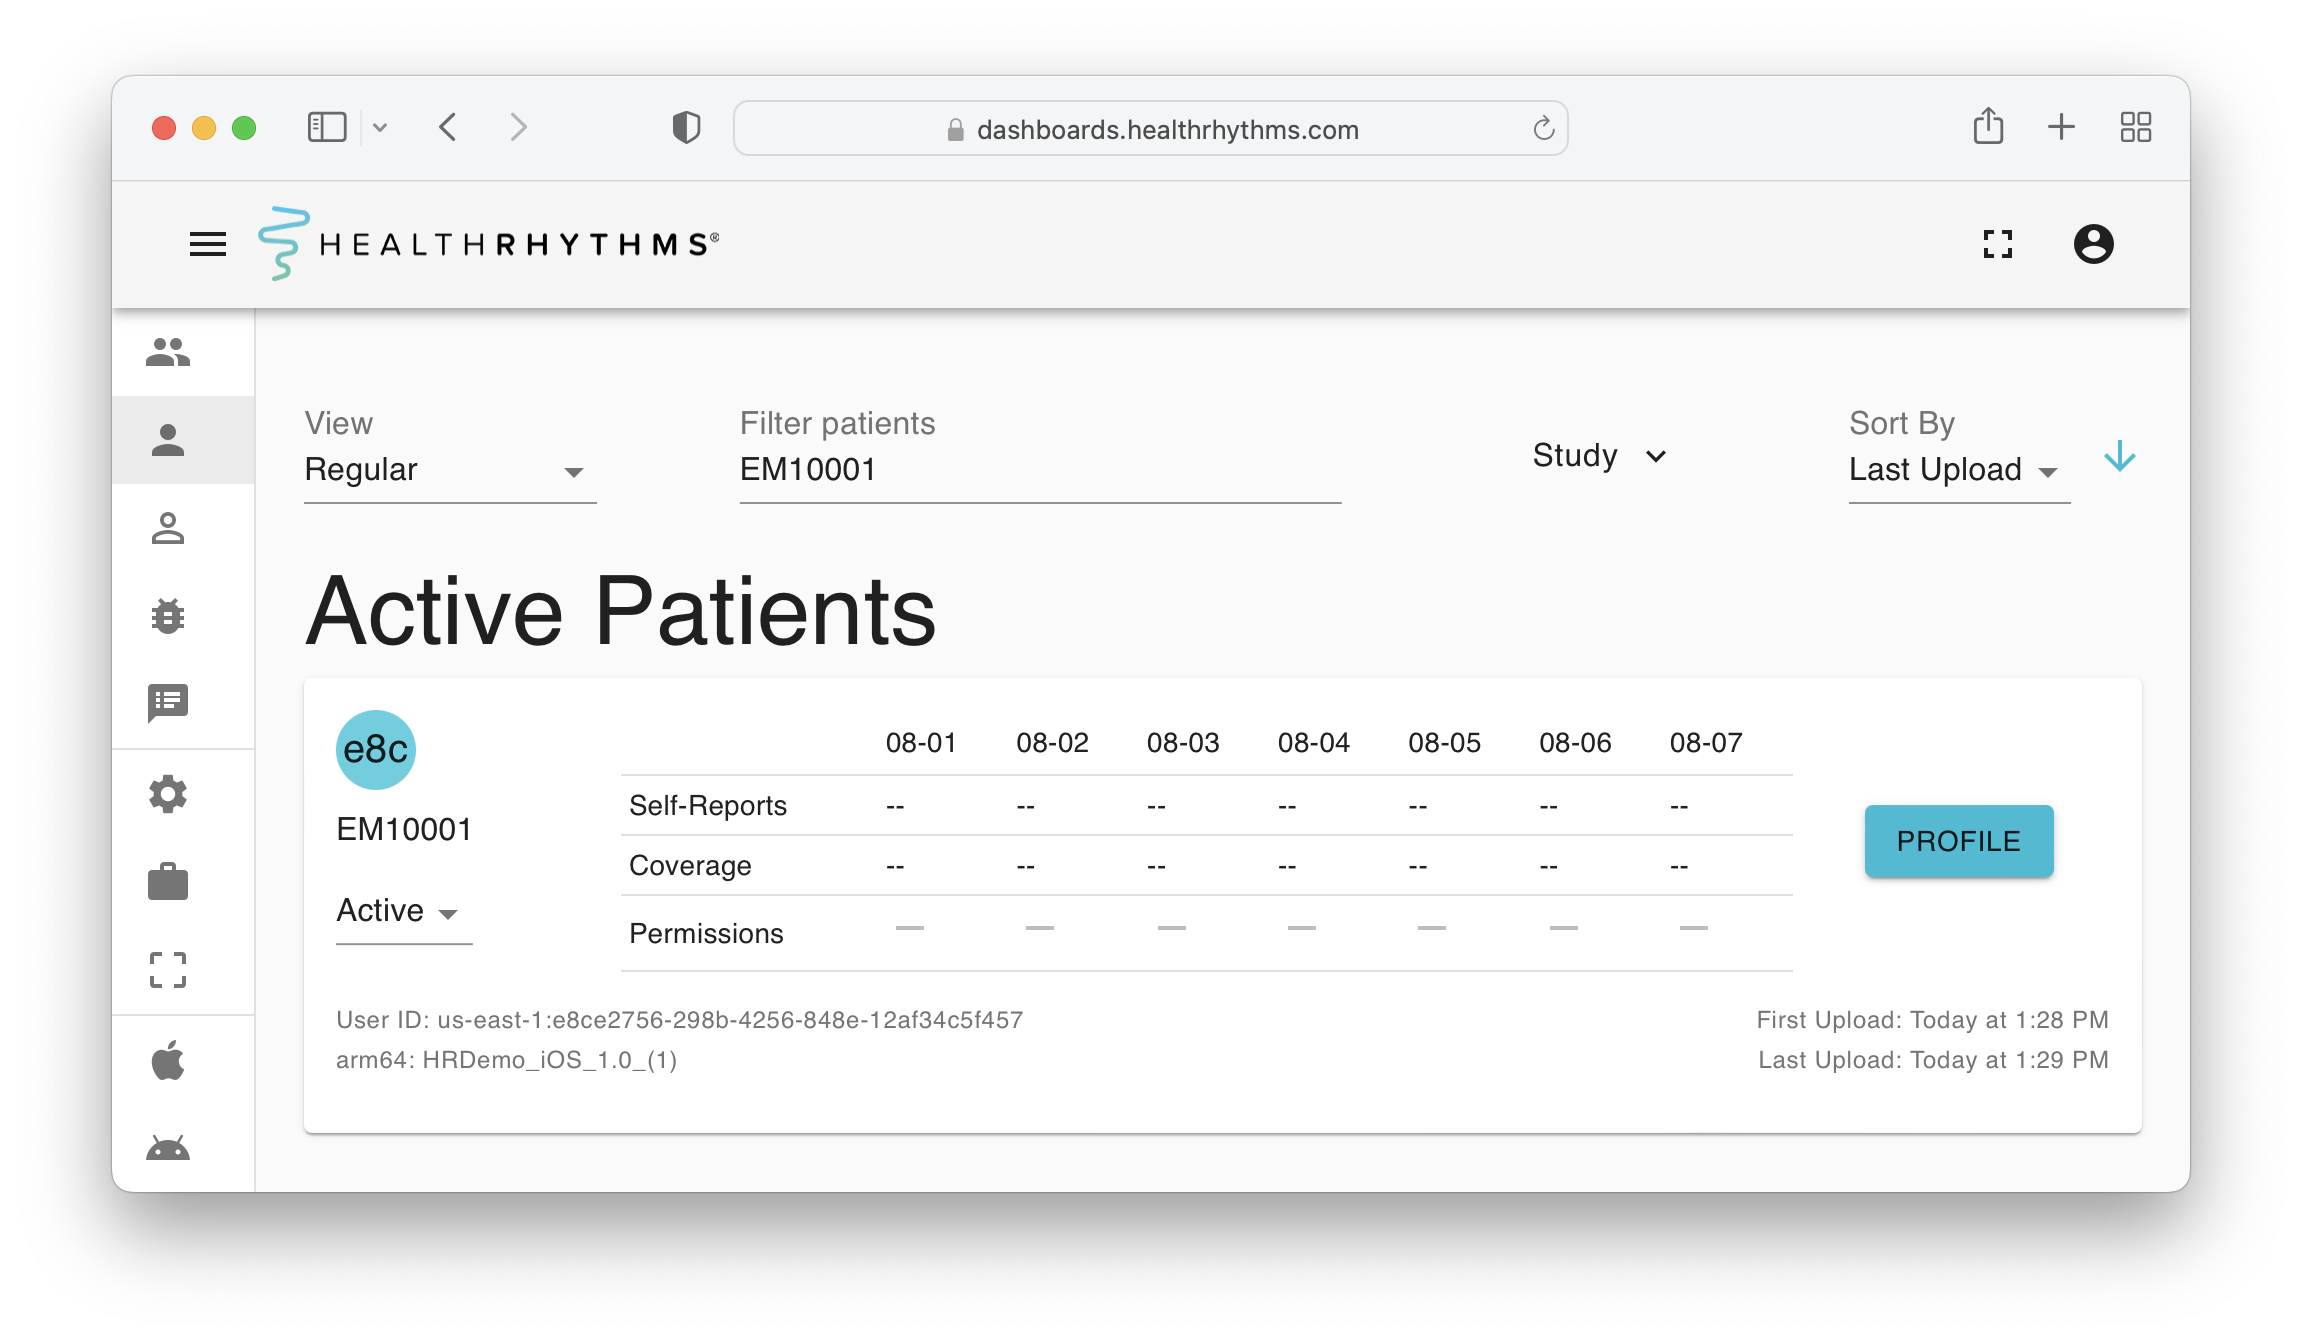
Validation
Now that you've completed the integration, you will see the sensing data on the HealthRhythms dashboards. Use this to verify that data is being collected and uploaded successfully.
Follow the steps below to verify the data is being collected and uploaded successfully:
- Run your project in an emulator or a real device.
- Enable required sensor permissions.
- Ongoing notification indicating sensing is active should show on the emulator or real device.
- Log in to your HealthRhythms dashboard, and you should see the sensing data uploaded after a few moments.
Stationary devices will not collect data
When a phone is stationary, e.g., on top of a table, there is no data collection since there is no trigger of location change, step count or transition of physical activity. The phone must be carried around for a realistic data collection test.
Providing your own backup rules
Our SDK defines some rules to control which files are not backed up and hence restored, if the user uninstalls and reinstalls the app or switches to a different device for example. If you're providing your own rules, it will cause our rules to no longer work. In that case, it's important that you add the following lines to your rules
For Android 11 and lower
<full-backup-content>
    ... <!-- Your rules -->
    <exclude
        domain="sharedpref"
        path="com.healthrhythms.hrsensing.ON_DEVICE_PREFERENCE_FILE" />
</full-backup-content>
For Android 12 and higher
<data-extraction-rules>
    <cloud-backup disableIfNoEncryptionCapabilities="false">
        ... <!-- Your rules -->
        <exclude
            domain="sharedpref"
            path="com.healthrhythms.hrsensing.ON_DEVICE_PREFERENCE_FILE" />
    </cloud-backup>
    <device-transfer>
        ... <!-- Your rules -->
        <exclude
            domain="sharedpref"
            path="com.healthrhythms.hrsensing.ON_DEVICE_PREFERENCE_FILE" />
    </device-transfer>
</data-extraction-rules>
Handling notification taps
There are several different notifications that are generated by the SDK, like - requesting user to fill out a self report - requesting user to grant sensor permissions - requesting user to start the app so sensing can be restarted
Which activity is started
These notifications require further action in your app when it's started as a result of user tapping the notification.
Our SDK provides an integer intent extra with each notification that can be converted to an enum NotificationType and that can then be used to determine what further action might be needed.
class NotificationActivity : AppCompatActivity() {
   override fun onCreate(savedInstanceState: Bundle?) {
      super.onCreate(savedInstanceState)
      setContentView(R.layout.activity_notification_interceptor)

      val notificationType =
         NotificationType.fromValue(intent.extras?.getInt(HRSensing.EXTRA_NOTIFICATION_TYPE))

      when (notificationType) {
         NotificationType.SELF_REPORT -> {
            // There's a pending self report
            HRSensing.getInstance().startSelfReportActivity(context = this, promptId = null)
         }

         NotificationType.MISSING_PERMISSIONS -> {
            // Some sensor permissions are missing
            // Show permissions screen
         }

         NotificationType.SENSING_RESTART -> {
            // Sensing needs to be restarted
            // Start the activity that calls initializeSensing() API or call it directly here
            HRSensing.getInstance().initializeSensing { result ->
               if (result is Result.Failure) {
                  log("InitializeError: ${result.error}")
               }
            }
         }

         else -> {
            // No further action is needed
         }
      }

      // Remove intent extra after it has been consumed
      intent.removeExtra(HRSensing.EXTRA_NOTIFICATION_TYPE)
      // Finish activity as it should no longer be needed
      finish()
   }
}
Frequently Asked Questions (FAQ)
Can I use HealthRhythms SDK on older Android API levels?
Our SDK is retro-compatible with Android SDK 22 or higher (minSDK = 22) and is compiled and targets the latest stable Android SDKs to include all the latest performance, security and vulnerability fixes (targetSDK = 33, compileSDK = 33). In case your application is targeting a lower SDK level (e.g., 31), you can override our SDK library level by adding the following to your application AndroidManifest.xml:
<uses-sdk android:targetSdkVersion="31" android:compileSdkVersion="31" tools:overrideLibrary="com.healthrhythms.hrsensing" />
If your application uses dependencies that are not up-to-date, you can specify a strict version for that dependency in your application build.gradle. For example, to strictly use androidx.appcompat:appcompat version 1.3.1 and com.google.android.gms:play-services-location version 18.0.0, specify these in your application build.gradle: